
Chai Tea Latte Cupcakes
One of my favourite drinks for fall is, hands down, a chai tea latte. It was only a matter of time before I combined this amazing concoction together to create the perfect dessert. These cupcakes makes the perfect dessert to any fall or winter occasion. It’s all those warm fuzzy feelings captured in a cupcake.

You can feel the crispness in the air that is fall.
When the weather starts to change, I immediately want food that is warm and comforting. And now that I don't have to worry as much about summer's typical revealing clothes, I automatically eat more desserts!
One of my favourite drinks for fall is, hands down, a chai tea latte. To this day, I can't, for the life of me, understand why anyone would want a vegetable flavoured latte! I can't stand anything tasting like pumpkin - especially that artificial pumpkin flavouring. yuck!

Back in high school, a friend of mine first introduced me to her homemade chai tea, and I fell in love. I love all the warm spicy goodness that goes in to it - cardamom, nutmeg, cloves and my personal favourite, cinnamon, of course. It was only a matter of time before I combined this amazing concoction together to create the perfect dessert.
These cupcakes makes the perfect dessert to any fall or winter occasion. It’s all those warm fuzzy feelings captured in a cupcake.
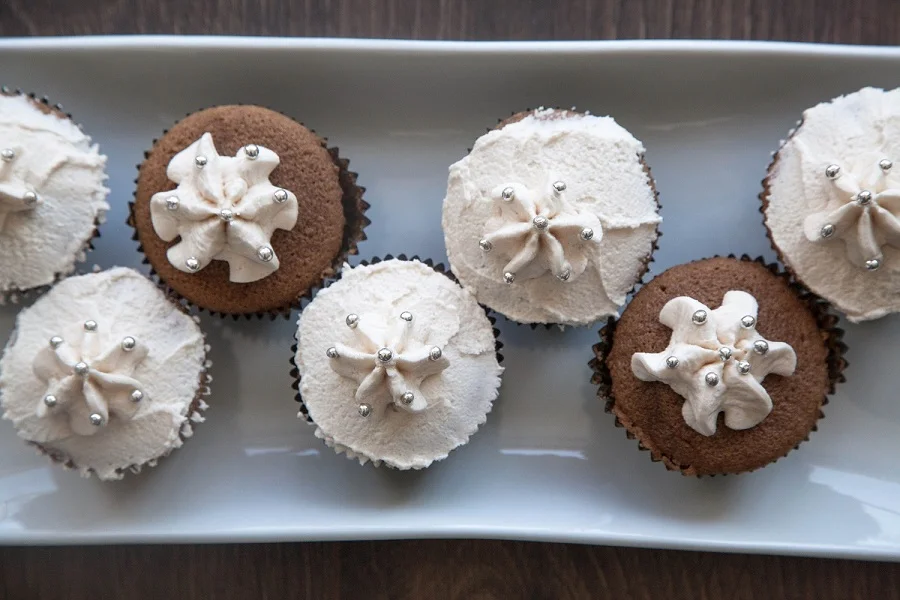
Makes: 18 cupcakes
Prep time:
Cook time:
- 1/2 cup unsalted butter
- 1/2 cup sugar
- 2/3 cup instant chai latte powder
- 1/4 teaspoon ground ginger
- 1/4 teaspoon ground cinnamon
- 2 eggs
- 1/2 cup skim milk
- 1 teaspoon vanilla
- 3/4 cup all-purpose flour
- 3/4 teaspoon baking powder
- 1/4 teaspoon salt
- Pre-heat the oven to 350 degrees and line cupcake pan with cupcake liners
- In a large mixing bowl, beat together the butter and sugar until fluffy (approximately 2 minutes).
- Add the chai powder, ginger, cinnamon, eggs, milk, and vanilla. Mix until well combined.
- Add the flour, baking powder, and salt until combined. Beat until smooth.
- Fill the cupcake liners about 2/3 of the way.
- Bake for 15 to 20 minutes, or until a toothpick inserted in the center comes out clean.
- 2 cups icing (powdered) sugar
- 1 teaspoon ground cinnamon
- 1/2 teaspoon ground ginger
- 1/4 teaspoon ground nutmeg
- 1/8 teaspoon ground cloves
- 1 cup vegetable shortening
- 1 teaspoon vanilla extract
- 1 to 2 tablespoons cold water, as needed
- In a large mixing bowl, beat together all the ingredients until fluffy.
- Spread on cooled cupcakes using a spatula or icing tip.


Photo Gallery Wall
I have tons of photos from my travels (the only souvenirs I need and collect!). But more importantly, I never made a photo album for our wedding photos. Instead, I framed the really good ones (we were lucky to have a lot of great shots) and created a gallery wall.

As you may know, the Mister and I recently moved into a new condo.
I absolutely love the new space, but since the layout is completely different from our previous place, this means redecorating from scratch.
The new place is more of an open concept compared to where we were before and I've lost a lot of wall space. While to most people, this may not seem like a big issue, in fact, it may seem like a bonus! But keep in mind that I'm a photographer first. I have tons of photos from my travels (the only souvenirs I need and collect!). But more importantly, I never made a photo album for our wedding photos. Instead, I framed the really good ones (we were lucky to have a lot of great shots) and created a gallery wall.

In my old condo, I made a 3x5 gallery wall (which you can see here) but I just don't have a similar wall space anymore. Instead, I opted to create a 2x7 gallery wall.
I got these 11x11 black gallery frames from Chapters-Indigo. I fell in love with the simplicity of these frames and love that they practically match any decor.

The first thing I did was lay everything out on the floor to decide which photos will go where. I mixed in a few photos from some of the places the Mister and I have traveled to - just to mix it up a bit.


After this came the hard part - how high do I hang them??
I have a really odd drop in the ceiling, bringing the ceiling height to 7 feet on the only wall that I could display my photos. I have read that the centre of your "wall art" should be at 5'5". This may work well with large pieces but I don't think that translated well with a photo gallery wall. Instead, i made the bottom row centred to 5'5". (When I did the 3 rows at my old place, I made sure that the centre row was centred to the height of 5'5".) Because I don't like nails or holes in my walls, I opted to use the Command Picture Hanging Strips to hang my photos.
I must say, I am quite happy with the final results (even if it did take me months to finally get around to!).


Easy Sugar Cookies
If you follow me on Instagram, you already know that I make a lot of sugar cookies - for every season.

If you follow me on Instagram, you already know that I make a lot of sugar cookies - for every season. To the point now, where if I don’t, my nieces and nephews get mad at me, and they aren’t afraid to voice their frustration.
It started with my niece’s first birthday. Then Christmas. Then more birthdays. They’ve now asked me to make it for every occasion possible – including Thanksgiving. (Did the pilgrims have sugar cookies? …did they have a turkey??)
I do decorate the cookies in their choice of theme for their birthday using royal icing. And quite frankly, I think they just love the cookies for the sugar rush. (we all need to get our fix somehow).
I have included my personal favorite recipe below but you could use a packaged mix. If you are using cookie cutters, you will need to make the packaged dough a bit drier so that it holds its cutout shape when you bake it. You can add a bit more flour and reduce the amount of liquid that the recipe calls for. For example, most recipes call for 3 cups of butter and I use at least half that. (I have to make up for the ton of sugar I use to decorate the cookies with so this is about as healthy as it's going to get!)

Once the dough is made, I leave it to sit in the fridge for at least an hour. Chilling the dough helps when you roll out the dough and keep the shape of the cutters you are using.
Try to leave some space between each cookie when placing it on the cookie sheet as the cookies expand a bit when baking. I can't tell you the number of times I took the cookies out of the oven only to see them morph together!

Once out of the oven, if the cookies are touching a bit, you can separate them using a butter knife as soon as they come out of the oven and are still soft. Once the cookies have cooled, separating them may be more difficult.

Easy Sugar Cookie Recipe
Makes: approximately 30 cookies (depending on the size of your cookie cutters)
Cook time:
- 1 ½ cups of softened butter
- 1 cup of white sugar
- 2 eggs
- 1/2 tsp vanilla
- 1 onion (finely chopped)
- 2 ½ cups all purpose flour
- 1 tsp baking powder
- pinch of salt
- Instruction 1 In a large bowl, cream together butter and sugar until smooth. /li>
- Instruction 2 Beat in eggs and vanilla.
- Instruction 3 Mix in dry ingredients - flour, baking powder and salt.
- Instruction 4 Cover and chill in the fridge for at least 1 hour.
- Instruction 5 Preheat oven to 400 degrees Fahrenheit.
- Instruction 6 Roll out dough (I do mine in batches!) to about 1/2 or 1/4 inch thick and cut our cookies.
- Instruction 7 Place on baking pan 1 inch apart on an ungreased baking pan.
- Instruction 8 Bake for approximately 8 minutes or until golden.

Wedding Gallery Wall
If you have a lot of photos that you would like to display, I would highly suggest you show them off in a gallery wall!

gallery wall
So many times, people would come over and ask to see our wedding photos. Given that we had so many great photos, I wanted to do something out of the ordinary with them. I decided to create a 5X3 gallery wall. (I read somewhere that hanging things in odd numbers is more visually pleasing.)

black and white photo wall
I used very simple 13X13 square gallery frames that hold a 5X7 photo that I found at Indigo. I personally think this is the perfect size - not too big and overwhelming for the small room I would be displaying them, but big enough that it invites you to take a better look. The black gallery frames with white matting and my black and white wedding photos work perfectly with my decor.

wedding gallery wall
I printed off a number of our wedding photos and even mixed them up with a few pictures of places we had traveled to together - especially since we got engaged while on vacation. I spread out all of my photos on the floor to decide where their place on the wall will be. It took a lot of measuring and a lot of calculations, but it worked! I am very happy with the results.

condo sized gallery wall
If you have a lot of photos that you would like to display, I would highly suggest you show them off in a gallery wall!

small room gallery wall

square frame gallery wall